
Kết quả 1 đến 1 của 1
-
07-26-2018, 04:25 AM #1
 Silver member
- Ngày tham gia
- Jul 2018
- Bài viết
- 4
how to make a step popup card and mechanisn
Step 1: Supplies and Prep
You'll need two card blanks of the same size for the card face and the pop-up mechanism. The pop-up mechanism is made separately and is glued inside the card face. It's best to use card blanks of the same color to camouflage the pop-up mechanism somewhat.
To make stamped pop-up elements you will need white cardstock and colored cardstock for mats.
Gather a variety of paper and cardstock that coordinate with the colors used in your card.
http://paperartviet.com/
Make card front Step 2: Make Card Face
Use one of the card blanks to make the card face. The card face can be made using any technique you like; however, it is important that the card have a horizontal aspect to make the most effective use of the step pop-up. Set aside the completed card face while you make the pop-up.
The sample birthday card features serendipity squares that make good use of your paper scraps—see the Serendipity Square Cards tutorial.
Make pop-up elements Step 3: Make Pop-Up Elements
Pop-up elements are glued to the pop-up steps/platforms. Anything that is flat and will fit inside the folded card can be used. For the sample card, a stamped, matted message card and a stamped cutout are used. Your matted message card should be about 1¼" to 1½" by 3¼" to 3½". The cutout can be up to about 2" square.
Tip: Use felt-tip markers to color the stamped image and tiny rubber stamps to decorate the message card.
Mother's Day Pop-up
Printable for Mother's Day pop-up elements
Pop-up Elements
Printable for pop-up elements
Project extras: As an alternative to rubber stamps, use the birthday pop-up elements printable to make pop-up elements for birthday cards. Choose from colored and black and white printables that you print and cut to create the elements for your pop-up card.
Mother's Day: Make a pop-up card for Mother's Day using these printable messages and banners. Choose from colored and black and white patterns that you print and cut to glue to the platforms in your Mother's Day pop-up card.
Step 4: Make Step Pop-Up
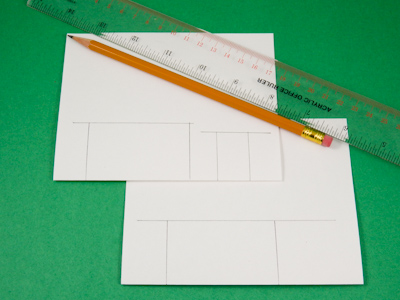
Draw lines for pop-up step platformsUse the second folded card blank to make the pop-up mechanism. To form the pop-up steps/platforms, you will cut parallel slits from the folded edge of the card blank.
First, use the pencil and ruler to draw a line 1½" from the folded edge and parallel to it. Next, draw two vertical lines from the first line to the folded edge—they should be about 2½" apart and parallel to each other. The left line should be about ¾" from the left edge of the card blank.
About ¾" to the right of the first step, draw a second step. Draw a line 1¼" from the fold with vertical parallel lines that are ¾" apart.
Tip: For a simpler pop-up, only make the first step. It can be drawn anywhere along the fold, but no closer than ¾" from either side.
Tip: Skip the measuring by using templates. See the side bar to the right for details.
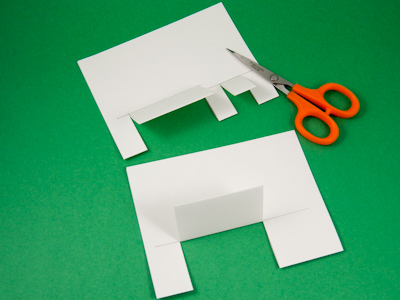
Cut pop-up step platformsCut on the vertical lines from the folded edge to the drawn horizontal line.
Fold the cut steps on the horizontal line between the cut lines. Unfold.
Invert pop-up step platformOpen the card blank and push the steps through to the other side. With the pencil lines on the outside, fold the card blank at a 90° angle. You will be gluing the pop-up elements to these steps/platforms.
Step 5: Test Pop-up Mechanism
Test pop-up mechanismTest your pop-up mechanism by making sure it folds flat. Also, use repositionable tape or glue to attach the pop-up elements to the pop-up steps. Fold the pop-up flat and make sure the pop-up elements do not extend beyond the edges of the folded card.
Make any adjustments needed before proceeding.
Glue pop-up mechanism and card front together Step 6: Glue Together
Glue the pop-up mechanism inside the card face, being sure to align the edges. Apply glue to one side of the pop-up, avoiding the step, and slip it inside the card face. Apply glue to the other side and fold the card face over onto it.
Open the card and allow the glue to dry.
Step 7: Glue Pop-Up Elements and Finish Card
Glue pop-up elements to mechanismGlue the pop-up elements to the steps. Decorate the card behind and around the pop-up steps. You might stamp more images of the cutout, add a greeting or write a message. Use your imagination!
That's it! Your pop-up card is done!
Completed pop-up card
http://www.auntannie.com/greetingcards/step_popup/View more random threads:
- Đặt phòng Emeralda Resort đêm 15, 16/2
- Bài viết này sẽ cho bạn biết nên mua đàn piano cũ hay đàn piano mới?
- Con Gái thực dụng yêu 1 người cặp bồ với nhiều người :D
- Lâu đài cổ tích trên ngọn đồi mê hoặc
- 2016 Film TV Online : Ice Fantasy Engsub Full HD Movies
- Xem Phim HD Chất Lượng Cao - Bat Kha Khang Luc 2016
- Xem Phim Mười Năm Yêu Em - VTV1 Thuyết Minh Tập 10
- Xem Phim Trọn Bộ HD Online - Phim Truyền Thuyết Biển Xanh Full HD 2016
- Xem Hậu Duệ Của Mặt Trời Trên Phimhayso.com
- Xem Trọn Bộ Hài Tết 2017 Bờm Full HD

 Trả lời kèm Trích dẫn
Các Chủ đề tương tự
-
In danh thiếp ép kim full nền – name card của vẻ đẹp tuyệt vời
Bởi damkhattinhoa88 trong diễn đàn Rao Vặt Tổng HợpTrả lời: 0Bài viết cuối: 04-14-2018, 07:19 PM -
Hướng dẫn một vài tính năng cơ bản về tansonic - một loại card ghi âm
Bởi sieuthitongdai123 trong diễn đàn Rao Vặt Tổng HợpTrả lời: 0Bài viết cuối: 12-11-2017, 05:11 PM -
Những điểm vượt trội của Card ghi âm điện thoại
Bởi sieuthitongdai123 trong diễn đàn Rao Vặt Tổng HợpTrả lời: 0Bài viết cuối: 12-11-2017, 05:55 AM -
Chuyên bán card mở rộng 08 port Panasonic KX-NS5173
Bởi Namvietnet trong diễn đàn Rao Vặt Tổng HợpTrả lời: 0Bài viết cuối: 11-17-2017, 12:39 AM -
Hướng dẫn dùng Card của tổng đài Panasonic KX-TES824
Bởi sieuthitongdai123 trong diễn đàn Rao Vặt Tổng HợpTrả lời: 0Bài viết cuối: 11-03-2017, 01:01 AM


Tìm hiểu Vòng tay ngọc bích xanh...
Hôm nay, 07:28 PM in Rao Vặt Tổng Hợp